HOW TO get the perfect look with Caromal Colours' Perfect Plaster

The look and feel of real plaster walls just stirs an emotion that says ‘this home is inviting’. Plain white walls are just that...plain and white. But, when you add texture, movement and colour you add character, warmth and charm. Click here for our gallery of beautiful plaster projects.
 The variations of plaster are as numerous as the areas they come from, the materials used to create them and the hands that crafted them. Use Caromal Colours Plaster to create your own mood and climate. There are endless variations of plaster finishes, and all of them are correct as long as you love the way they look! These finishes can be lightly sanded if you like (we use a sanding block or small electric sander). Any layer of your finish can be glazed to add colour. Use Caromal Colours® Wall Glaze as directed when the finish is dried. Sand first to make glazing easier. You can also add water to Caromal Colours® to give your plaster finish a “wash.”
Surface Preparation
We recommend creating a sample board on a piece of poster board from a craft store painted the same colour as the wall. Caromal Colours® Perfect Plaster can be applied over almost any previously painted surface. If you feel the wall surface is not a good quality paint, apply one coat of Caromal Colours® Wall Sealer.
Be sure the surface is clean and dry.
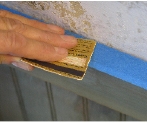
Tape off areas that won’t get the finish, like ceilings and moldings. Press down, or burnish, the edge of the tape to insure a nice clean line. You can use ½ of an old credit card with the edges sanded to be more rounded.
Tape off the wall next to the one you are working on (adjacent wall) so that you only have to work one side of the corner at a time.
Now you're ready to apply your plaster. There are various ways of doing this. Here are a few of our favourite techniques:
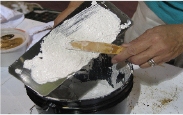
Rolling on Plasters
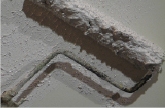
It usually takes a few rolls to “load” your roller with plaster. You will need to dip in the roller tray quite often to reload the roller.
You can add up to 10% water to your plasters if you are having a difficult time rolling them.
You can cover the surface completely or leave a bit of basecoat show through.
Roll thicker or thinner, even or uneven …it just depends on how you like it.
Brushing on Plasters
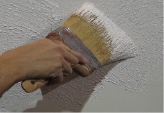
To brush plaster on the surface, use a small brush for a small surface and a larger brush for a larger surface.
Brushed plaster textures can be crisscross, in a vertical direction, or have a random pattern. Whichever way you brush will be your finish or will set up texture for your next layer.
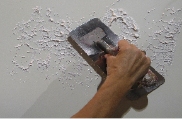
Troweling plasters...the basics
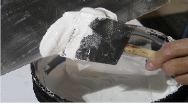
Load your trowel using a foam brush or any other tool with which you feel comfortable.
“Dropping off material” onto the surface, requires keeping the trowel flatter to the surface.
“Picking up material”, requires holding the trowel more perpendicular to the surface.
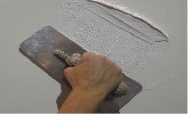
Troweling Tips:
Troweling is like spreading peanut butter…it is that simple!
Brush some material into corners and edges and trowel out from that material for perfect corners and edges.
Gradually ease the trowel onto the surface (like a plane landing). End your stroke (you guessed it) like a plane taking off.
Your troweling should be in graceful arcs or‘s’ shapes – not in straight lines.
Caromal Colours Perfect Plaster comes with a convenient plastic scraper. You may want to advance to a professional trowels if you are doing a large space.
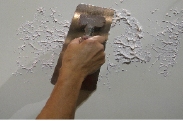
Skip Troweling and Knocking Down the Plasters
Spread some plaster onto your trowel like mayonnaise.
“Plop” the material onto the surface here and there and let it set up for 15-30 min.
Holding your trowel flatter, very gently knock down the peaks to create a more natural effect.
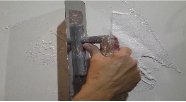
Skim coating plaster
Skim coating is always done as a second layer.
Sanding your first layer of plaster makes skim coating less work.
Apply material to your trowel and tightly scrape it into the first layer.
You can cover your first layer 100% or leave some of the first layer showing through.
Plaster Variations
There are so many different looks you can achieve with Caromal Colours Plaster. Here are a few examples of similar yet different finishes.
A. Caromal Colours® Perfect Plaster rolled on, wait 45 minutes, knock down texture with trowel.
- Dagny Musclow
Comments 0