No-stress Distressing HOW TO (using Caromal Colours textured base coat and toner)


Oh, how we all love the antiqued charm of an heirloom-piece polished by weather and time. And it's never been easier to achieve this look then it is now, with Caromal Colours' Artisan Collection. We positively adore the various distressed looks that are possible by combining the textured base coat and toner. Make sure you check out some of the different finishes that can be achieved with these popular products in our 'see the finish' blog post.
In the meantime, here's our 'step-by-step no-stress distressing how to' using the Caromal Colours Artisan Collection:
Step One: Find the story in the finish.

Distressing can add charm and character to any object. Painting a piece of furniture to change its color is a simple task, but telling a story about that piece of furniture through the art of distressing is clearly a whole different experience. When you decide to distress something, think about the story you wish to tell. This will help you accomplish the painted finish in a whole new way.
For example, when applying your basecoat colour, if you paint it thin and do a lot of sanding, your piece may look as though the paint has been worn away over time by wind and weather. If you apply the paint thick and sand only the edges it may look as though your piece has had many coats of paint over the years and has gotten minimal wear and tear. Don’t be afraid to paint thick or thin, to sand a lot or a little, to bang with a brick or a nail.
Step Two: Apply the Textured Basecoat
One of our favourite things about the Caromal Colours textured base coat is that it can be applied to just about anything, without any stripping, sanding or priming! It will bond to raw or painted wood, metal, tile, glass, brick, stone, or even laminate and plastic. As if that weren't awesome enough, it can be applied over an oil, varnish, urethane, or latex surface.
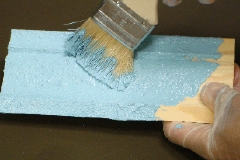
Simply clean the surface to be distressed with a mild cleaning solution and then let it dry completely. Once its dry, apply the basecoat. You can use the chip brush provided, a larger brush or even a roller for a large surface. There's no need to worry about how you apply the basecoat. The more irregularly you apply it the more interesting your distressing story will become.
On the piece of molding shown here, we brushed the textured basecoat every which way. We pushed and mushed, separating the bristles of the brush, painted it sideways and pounced the paint this way and that. That will achieve the interesting texture you will see in our end result.
If you are painting an extremely challenging surface and you notice the basecoat crackles slightly when drying, simply sand the crackling areas and apply the basecoat again.

Once the basecoat is applied, let it dry completely.
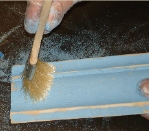
Step Three: Sand the basecoat.
This is where your 'story' really comes into play. Think about where the normal wear and tear would occur on your piece and concentrate your sanding in those areas. For example…a chair would be more distressed on the arms or bottom of the legs, where the back would hit the chair rail and where you would sit and lean on it.
Sand as much or as little as you like. Adjust the size of your sandpaper to the size of the item you are sanding by tearing or folding or both. Use 220 grit sandpaper for mild sanding and 80-100 grit for more dramatic distressing. You can “cheat” by using a little hand sander as shown. No household should be without one of these!
Avoid even or repetitive sanding, (like going over all the edges perfectly the same). You can sand flat areas as well as edges and wear areas. You may also want to “ding” and “bang” your object using things like old keys, bricks, or putting in little nail holes to represent wear from bugs.
Once you've sanded to your satisfaction, use a soft brush or cloth to wipe away sanding dust from the object.
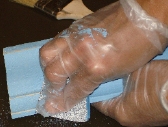
Step Four: Apply the Toner

The way you use your toner will help to tell your distressing story.Leaving more toner, heavier in crevices, will give you a more dramatic effect.Sanding back areas to raw wood will allow the toner to “stain” the edges creating a darker effect on those areas.
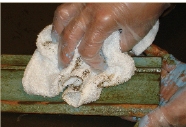
To apply the toner, you can use the chip brush provided, a larger brush or even a roller for a large surface. Once the toner is applied, you can wipe some of it off using any soft cloth. If the cloth is slightly damp it will remove more of the toner. Alternatively, you can use a dry cloth that will “smear” more and remove less of the toner. There is no right or wrong when it comes to how much toner to leave on or remove. You can always reapply a second layer of toner to certain areas to distress even more.
Once you're happy with the appearance of the toner, you can seal your surface using any topcoat as desired. (We like Liberon Wax)
Step Five (optional)

If steps one through four have caused your to catch the distressing-bug, you can add more drama to your piece by adding some flyspecks, which add age and character to any piece.
To achieve this look, use an old toothbrush, dip it into the toner, dab off some of the toner onto a cloth or paper towel and create “flyspecks” by pulling your finger or thumb through the toothbrush.
That's it!
Easy right? It's fun too! Take a look at some finishes we love by clicking right here!
- Dagny Musclow


Comments 0